Список разделов » 3D Уроки » 3D Studio Max
Создание мотка веревок, ну ОЧЕНЬ красиво!!!!!
| Автор: Apocalisso | Урок на английском, времени и сил небыло перевести, но пока почитайте английскую версию, дня через 2 переведу. Если урок понравиться, не забываем ставить +!
INTRODUCTION
The idea
Some users asked me writing down a tutorial concerning candelabrum body rope knots, a detail from a recent scene.
This project born fortuity when i had to model some objects for interiors. An odd but interesting design candelabrum was in the number.
A detailed modeling is not necessary since candelabrum takes a small area in render window.
TUTORIAL
Joint knots are the most complex part of model. First modeling step includes a way to make it easier, creating a semplified geometry.
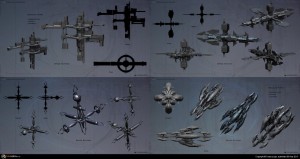
Structure's componed by pipes, simple cylinder primes (Tube_01, Tube_02, Tube_03). Assign a steel shader, in order to fill any winding hole and avoid empty zones. Three knots (Node_01, Node_02, Node_03) are: - an editpoly with turbosmooth modifier on; - two spheres modified by "FFD4x4x4".
We will use those geometries as spline-rope modeling base, with an useful scipt :
We just need to drop his file in viewport to install the script. After go in CUSTOMIZE->CUSTOMIZE USER INTERFACE -> and look in Advanced Painter class, to add a toolbar or a shurtcut.
Thanks to the script we can paint several objects on geometries, such as grass, hair, stones, or using external objects to create random distribution, useful to paint forests. We're going to use "Spaghetti" tool, able to draw simple Splines on meshes, keeping his radius as distance from surface.
Select object, Node_02 for example. Now select spaghetti tool, define "Radius" and click "Paint" to get all the Splines we need.
Shaping stops when we rotate viewport to paint Spline on knot opposite side. Remind: Spline thickness on viewport depends on "Enable in Viewport" and "Enable in Rendering" automatic checking.
Just band together with "Attach".
In order to reduce Spline vertex over numbering due to "Spaghetti" tool, add "Normalize Spline". Use "Vertex Thicks" to show vertices.
Collapse Splines or add "Edit Spline" to weld final vertices.
Replicate many times to complete knot covering.
A boring part of this job: manually moving Splines vertices to reduce intersections. Collapse all in the end.
Use "Sweep" modifier with a custom shape to increase rope detail.
"Sweep" modifier automatically creates UVmapping saving any unwrapping. Proceed with displacement texture.
In displacement slot add a texture similar to that one:
Follows our rendering with a bumpmap:
by Francesco Legrenzi @ copyright 2009
Понравился урок? Поставь +! |
| Автор: Melentiev A | Ух ты плин!! Классно то как.))) Спасибо !!!))) |
| Автор: Alex Wer Graf | Во когда крысюков с кораблём лепил что-то подобное мастерил, тока до конца не довёл, умения нехватило тагда. Подробно надо будет изучить, думаю вскоре понадобиться может |
| Автор: Viktor | только вот я так и не понял как его устанавливать |
| Автор: Apocalisso | это скрипт! Как там... Scripts> Run Sript |
| Автор: Alex Wer Graf | У меня вроде загрузился но с ошибками. Под какой макс он написан, подойдёт он под 9 и ниже или может мне не надо париться а? |
| Автор: Ainex | Класс! |
| Автор: MiVlaX | nocel, отличный урок! спасибо! |
| Автор: Apocalisso | незачто!!!!! |
| Автор: ilopX | Вот это да..... |
| Автор: ilopX | за скрипт отдельное спасибо |
| Автор: Apocalisso |
|
| Автор: Alex Wer Graf | Было очень интересно, верёввочные волосы им вить удобно, только непричесываются они, и траву быстро лепить подойдёт |
| Автор: Vicol | Симпотично! |
| Автор: AndyAN | Если кому нада перевод (Удалено) By moder Во первых, не нужно рекламировать свой сайт. Во вторых, всем понятно откуда вы взяли этот урок, я догадываюсь. В третьих ты обрезали подписи автора несмотря на источник (о котором вы могли узнать только с нашего сайта, возможно....) это является нарушением авторского права. |
Количество просмотров у этой темы: 23655.
← Предыдущая тема: Делаем заброшенное здание.


 подскажите плиз кто уже его опробовал





 2015 © ART-Talk.ru - форум про компьютерную графику, CG арт, сообщество цифровых художников (18+)